
Welcome to our comprehensive guide on mastering the art of flight in golf. In this article, we’ll dive deep into two essential shot-shaping techniques – the Draw and the Fade. As seasoned golfers know, these shots can be the key to unlocking new levels of control and precision in your game. Whether you’re a seasoned golfer looking to refine your skills or a beginner eager to learn, we’ve got you covered. Let’s explore the intricacies of these shots and equip you with the knowledge to elevate your game to new heights!
1. Understanding the Draw and Fade
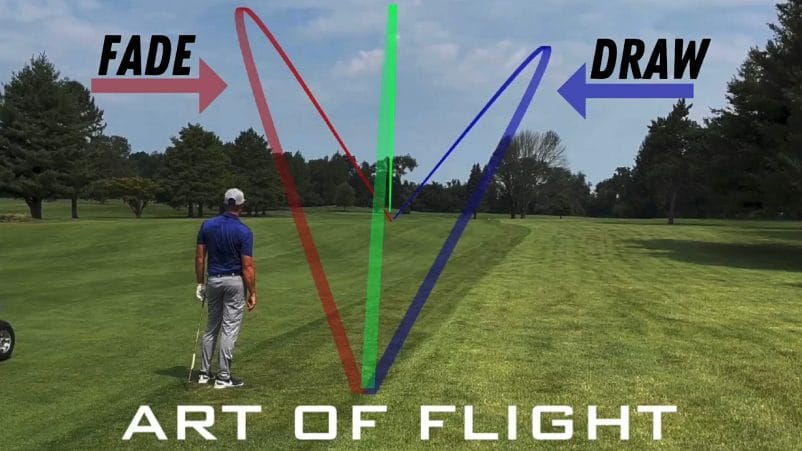
Before we dive into the details, let’s clarify what exactly the Draw and the Fade are. Both are types of controlled shots that enable golfers to manipulate the ball’s flight path and direction.
The Draw: The draw shot is known for its right-to-left trajectory for right-handed golfers (left-to-right for left-handed golfers). To execute a draw, the player imparts a clockwise spin on the ball, causing it to veer gently from right to left (for right-handed golfers) during its flight. This shot is often preferred when golfers want to tackle obstacles on the course and produce a controlled accurate shot.
The Fade: Conversely, the fade shot showcases a left-to-right trajectory for right-handed golfers (right-to-left for left-handed golfers). To achieve a fade, the player imparts a counterclockwise spin on the ball, leading it to curve gently from left to right (for right-handed golfers). Golfers often utilize this shot when they want to navigate challenging course layouts and position the ball with finesse.
2. Mastering the Draw
a. Grip and Stance: A proper grip and stance lay the foundation for executing a perfect draw. For right-handed golfers, a slightly strong grip (rotated to the right) helps promote the clockwise spin required for the draw. Position your feet, hips, and shoulders parallel to the target line, aiding in a square clubface at impact.
b. Backswing: During the backswing, focus on a smooth takeaway and a slight inside path. Avoid taking the club too far outside, as this might lead to a slice rather than a draw.
c. Downswing and Release: The key to generating a draw lies in the downswing and release. Initiate the downswing with the lower body, allowing the club to approach the ball from an inside-to-outside path. As you strike the ball, focus on rotating your forearms to encourage the desired clockwise spin.
d. Follow Through: A balanced follow-through completes the draw shot. Allow your body to rotate fully and extend your arms towards the target, ensuring the clubface remains square at impact and through the follow-through.
3. Executing the Fade
a. Grip and Stance: For a fade shot, a slightly weak grip (rotated to the left for right-handed golfers) is more appropriate. Ensure your feet, hips, and shoulders remain aligned with the target line, promoting a square clubface at impact.
b. Backswing: During the backswing, maintain a smooth takeaway along the target line. Be cautious not to take the club too far inside, as this may lead to a hook rather than a fade.
c. Downswing and Release: The fade shot relies on an outside-to-inside swing path. Focus on initiating the downswing with your upper body and shoulders, allowing the club to approach the ball from the outside. As you strike the ball, concentrate on supinating your forearms to achieve the desired counterclockwise spin.
d. Follow Through: A balanced and controlled follow-through completes the fade shot. Maintain your posture and ensure your arms extend toward the target while the clubface remains square at impact and through the follow-through.
4. Selecting the Appropriate Shot
Knowing when to employ the draw or fade shot can significantly impact your overall performance on the golf course. Here are some scenarios where each shot might prove advantageous:
When to Use the Draw:
- Dogleg Left Holes: A draw can help you navigate dogleg left holes, setting up an ideal position for your next shot.
- Avoiding Hazards: When you need to steer clear of hazards on the left side of the fairway, a draw can be your best friend.
- Hitting into the Wind: Drawing the ball into the wind can reduce the impact of the wind resistance, allowing for better control.
When to Use the Fade:
- Dogleg Right Holes: A well-executed fade can help you manage dogleg right holes with ease and accuracy.
- Avoiding Hazards: When hazards are situated on the right side of the fairway, a fade can ensure a safe landing zone for your shot.
- Tailwind Assistance: Using a fade can help you combat the effects of a tailwind, promoting a more predictable ball flight.
In conclusion, mastering the art of flight – the draw and fade shots – is an invaluable skill for any golfer looking to elevate their game. By understanding the mechanics and intricacies of these shots, you gain a new level of control and precision on the golf course. Remember to practice diligently, as consistency is key to perfecting these shots.
So, next time you step onto the course approach your shot with confidence and use the draw or fade to your advantage based on the course’s layout and conditions. As you refine your skills, you’ll find yourself tackling obstacles with ease and positioning your ball precisely where you desire.